Filezilla is one of the best FTP programs available, and totally free. It doesn’t get much better than that.
There’s no better compliment to a WordPress (or any, for that matter) blog than FileZilla. This primer will show how easy it is to transfer files from your computer to your website quickly and easily.
1. Download and Install FileZilla – (download)
FileZilla is available for Windows (2k – Windows 8), Linux and Mac (Requires OS X 10.5 or newer)
2. FileZilla Interface
The image below describes the functions of each window of the interface. Transferring files is as easy as right-mouse clicking on the file and selecting “upload”. Take a minute to review the image.
3. Configure FileZilla for your website
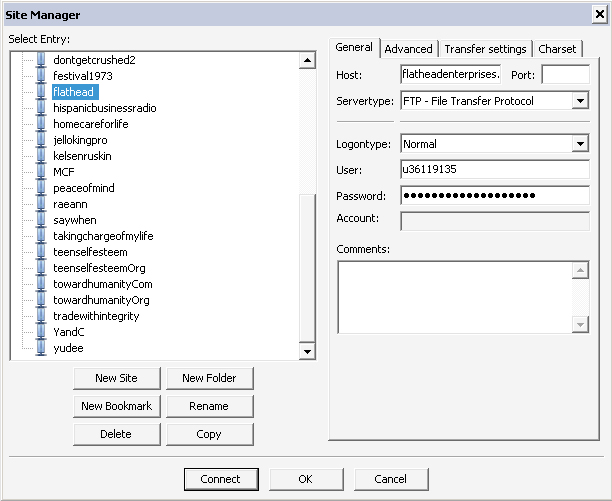
- Click on File>Site Manager
- Click on the “New Site” Button just below the “Select Entry” window. A new entry will appear and be highlighted under “My Sites” in the “Select Entry” window.
- Rename the new entry to whatever you want (something close to the site name could work, but it’s up to you)
- In the top right of the Site Manager window are four tabs; General, Advanced, Transfer Settings and Charset. General is the only tab you need, the default settings suffice 99.99% of the time. (I’ve never had to adjust any of the other settings in the 9 years I’ve been using FileZilla)
- In the Host: textfield (see below) type in the domain name of your site without the http://www (make sure to include the .com|.net|etc)
- Servertype: should be set at FTP – File Transfer Protocol
- Set Logontype: to Normal
- User: is your FTP user name
- Password: is, well your FTP password
important – User names and passwords ARE case-sensitive and there can be NO spaces between letters or words.
That should be all you have to do. Once those fields are filled in, you click on the “Connect” button and you should be in and ready to start transferring files.

4. Transferring Files
Basically, you’re moving files/folders (directories) from your computer (window 4 above) to your web server (window 5 above). The left side of the FileZilla interface is your computer, and the right side is the web server or remote site. You can do that by right-mouse clicking the files/folders(directories) and selecting “upload”. You can control-click or shift-click a group of files/folders(directories) and right-mouse click or you can even click and drag files/f0lders(directories) from anywhere else into the remote site file window (window 5 above). Window 6 will show you the status of your transfers.
5. A little more about how it works
When you first connect via FileZilla, you could get confused by all the folders/directories on your remote site/web server. If a number of folders/directories appear, the only ones you’re concerned with is “www” or “public_html”. Double click on that folder/directory and upload your files to there. Very often, both directories exist, if that’s the case upload to the “www” folder/directory.
If the “www” or “public_html” folders don’t exist, than you are in the root directory, upload your site there.
EVERY HOME PAGE IS ACTUALLY A FILE NAMED “INDEX” OR “DEFAULT” (example: index. htm, index.html, index.php, index.asp, default.asp, default.html, default.htm). If that file does not exist in your root directory, than users can not visit your website.
You’ll notice I always used folders/directories in the descriptions above. We’re used seeing folders on our computers, but they are always directories. On a web server, directories is more accurate terminology.
In the FileZilla interface image above, you see a number of directories. Those are the directories in my flathead site. The first directory is 4sale. If you were to open a browser and type http://www.flatheadenterprises.com/4sale in the address pane, it will take you to the contents of that directory. I have an index.html file in that directory, so you’re browser can read it, otherwise, it’s likely you’d get an error message.
FileZilla does not recognize changes you’ve made while the FileZilla application is open. For example, if you add an image to a folder that you’re working on while FileZilla is open, it will not automatically recognize it. You’ll need to either close and reopen the application, or as I do, click on some other folder than go back to the folder the image (or whatever) you added is in. There’s no automatic refresh nor is there a refresh button.
6. Backing up your site is a breeze
To me, this the best part. You’ve been working for days/weeks/months to get your site to a place where it’s really cool. But nothing is forever, and if you’re talking electronics, anything can happen at any moment. Create a folder on your computer called something crazy like “site-backup-(date)”. Open FileZilla, select all files and folders and download it to that folder. It’s gonna take a while, but you don’t have to wait for it, so go see what you have saved on DVR and check back later cause it’s all getting done. Afterward, burn it to a CD/DVD and you’re completely backed up. If you are using wordpress or some other database driven website application, than exporting the .sql file and saving that completes the backup, but if you know what that stuff is already, you probably already know this stuff anyway.
Don’t hesitate to ask me any questions, love to help.
peace.


Leave a comment