Why buy the same movie twice? Convert your DVD with two FREE programs.
1. Download and install DVD Decrypter and Super Video Converter
- Both are free software programs. DVD Decrypter was one of the original decrypting programs and still one of the best. Super is a free audio/video conversion program that can convert almost anything into almost anything.
2. Insert the DVD you want to convert and open DVD Decrypter.
- DVD Decrypter will automatically recognize the dvd and one simple click of a button will copy the files to your hard drive.

3. In DVD Decrypter go to “Edit>Select Main Movie Files”
- DVD’s are split into many different files (see above), but the actual movie is in a few VOB files, which are actually MPEG’s. As you can see in example #2, this movie was split into 4 sequential VOB files (VTS_03_1.vob through VTS_O3_4.vob). Don’t use the IFO file.
4. Make a note of the names of the files and where they are being saved.
- On windows machines, the default location is on the C:\ drive (or the same drive as your OS) and it creates a directory or folder with the name of the movie. (see example #2)
5. Click the DVD to hard drive button to save the movie.

6. Open the folder where the movies were saved, then open the VIDEO_TS directory or folder
- It’s helpful here to switch your folder view to either “List” or “Details” to more easily identify the files you need.
figure 1-

figure 2-

7. Open Super and choose the lower radio button in the top left. Select “Join Format-Identical Files” from the small arrow next to the window.
- In the top left of the program (see example #3), there are two vertically aligned radio buttons. The top radio button is to select the Output Container for the movie and the lower button is to select an Output Process. Clicking on the little arrow just to the right of the window will activate a drop-down menu where you can select your process.
8. Control-click or shift-click the files you need and drag them into the “Job List” window in Super.
- Hold down the control key while clicking on the files to highlight or select more than one, or if they are all together, hold down the shift key and click on the top and bottom files to select multiple files. Once selected, click and hold the selection and drag them into the “Job List” window. (clicking and releasing anywhere in the window that has the selections will deselect the files, and you’ll have to do it over)
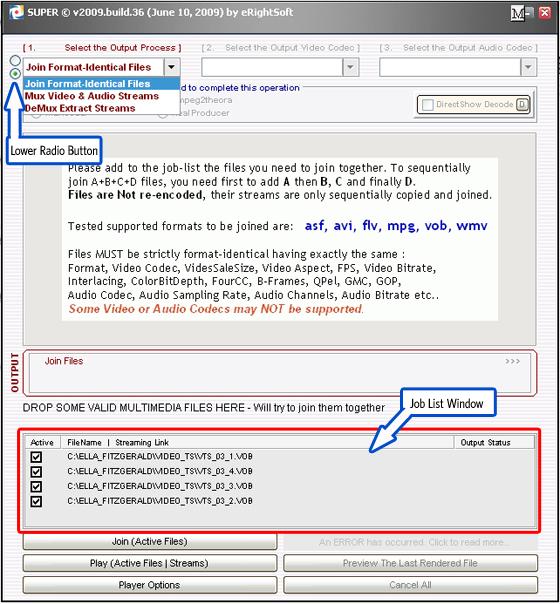
9. Click on the “Join (Active Files)” button just below the Job List window.
- The files need to be named sequentially – The file names need to be identical except for the last digit or letter in order for Super to recognize the correct order. The example is 1-4, but your files may differ and you may need to rename a few of the file names for the Join process to be successful.
10. After process is complete, remove source files from Job List and replace them with the newly created, “Join”-ed file.
- Joining doesn’t re-encode, it merely concatenates the separate movie files into one continuous movie file, which is probably how you’d prefer to watch it. By default, this version of Super copies the new file into the same directory or folder as the source files.
- Right mouse-clicking anywhere in Super will bring up the context menu where you can remove the files from the Job List.
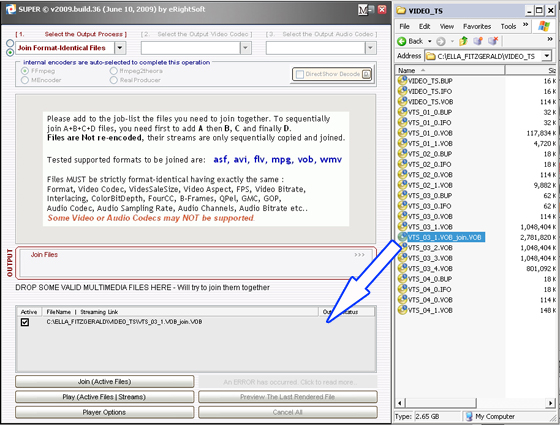
- Open the VIDEO_TS directory or folder, click and drag the new file into the Job List window.
figure 1-
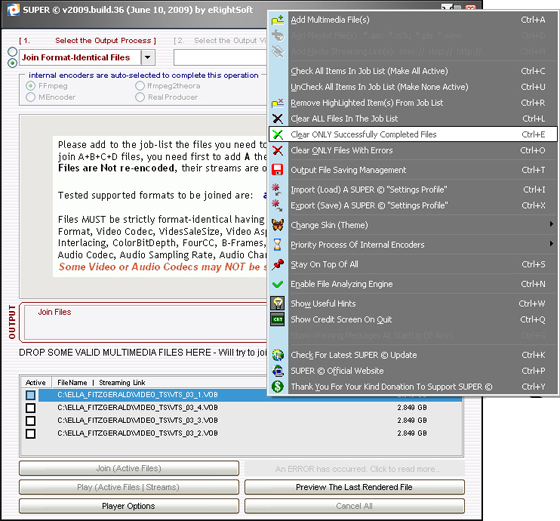
figure 2-
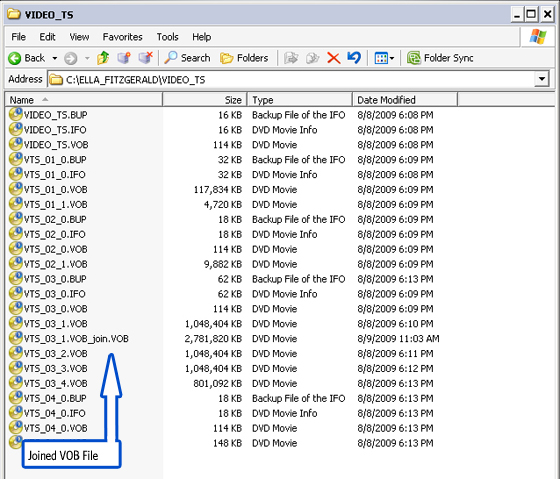
figure 3-
11. In Super, click on the upper radio button, click on the arrow to the right of the window and select “Apple iPod/iPhone (MP4)”
- Super offers several presets to encode your video – choosing Apple iPod/iPhone will automatically format your movie for your iPod

12. Click on the “Encode(Active Files)” button and within a few minutes (could be several), depending on your individual computer’s RAM and CPU speed, your movie will be saved.
- The time it takes to encode your movie can take up to the same length of the movie itself.
- 2-4 Gigs of RAM is recommended.
- The finished movie, formatted for your iPod will most likely be saved in the same directory or folder as the source files.
figure 1-
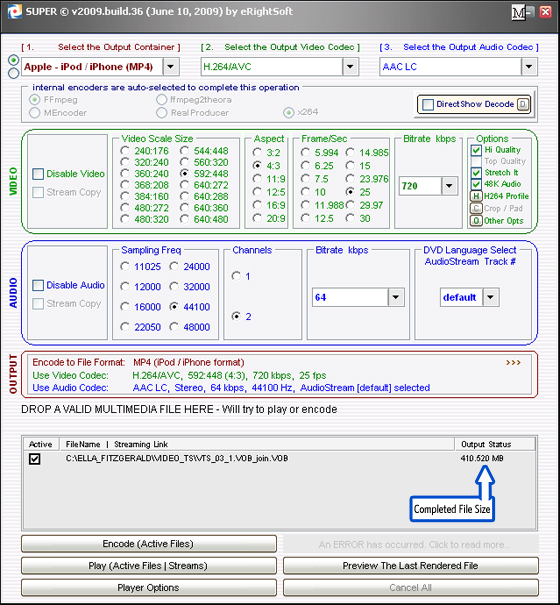
figure 2-
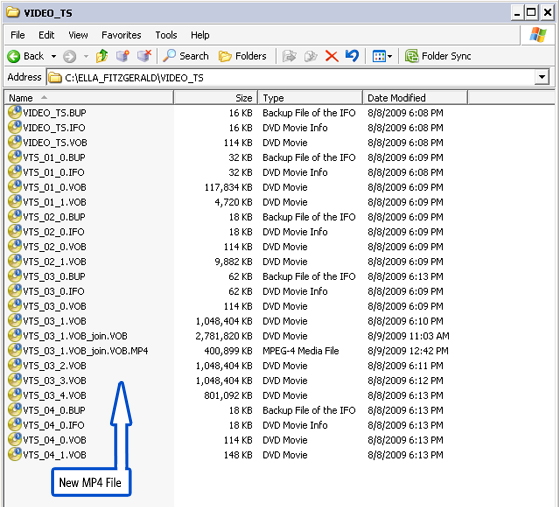
After your movie has been successfully converted, just add the new video to your iTunes video library and sync up. You may want to rename the MP4 file before adding to iTunes, but that’s up to you.
Please leave questions in comments section below.
Have fun.